There are a ton of managed Kubernetes services available today (and for sure even more tomorrow) to run your ASP.NET Core application.
If you want to run k8s locally you can spin up a whole cluster manually. Another solution is to use minikube.
So, what is minikube exactly?
Minikube is a tool that makes it easy to run Kubernetes locally. Minikube runs a single-node Kubernetes cluster inside a VM on your laptop for users looking to try out Kubernetes or develop with it day-to-day.
Installing minikube
In order to be able to install minikube you need to have a Hypervisor like VirtualBox (Linux) or VMWare Fusion (macOS) installed. (This post won’t cover Windows btw.).
After installing your Hypervisor of choice, you have to install minikube
On macOS
curl -Lo minikube https://storage.googleapis.com/minikube/releases/v0.30.0/minikube-darwin-amd64 && chmod +x minikube && sudo cp minikube /usr/local/bin/ && rm minikubeOn Linux (Ubuntu 18.04 here)
curl -Lo minikube https://storage.googleapis.com/minikube/releases/v0.30.0/minikube-linux-amd64 && chmod +x minikube && sudo cp minikube /usr/local/bin/ && rm minikubeInstalling kubectl
In order to manage your k8s cluster or minikube, you need a command line tool named kubectl.
On macOS
brew install kubernetes-cliOn Linux (Ubuntu 18.04 here)
sudo apt-get update && sudo apt-get install -y apt-transport-https
curl -s https://packages.cloud.google.com/apt/doc/apt-key.gpg | sudo apt-key add -
echo "deb http://apt.kubernetes.io/ kubernetes-xenial main" | sudo tee -a /etc/apt/sources.list.d/kubernetes.list
sudo apt-get update
sudo apt-get install -y kubectl
Running minikube
Its as simple as typing minikube start into your terminal. And guess what? minikube stop will stop it 😉.
Dockerizing ASP.NET Core
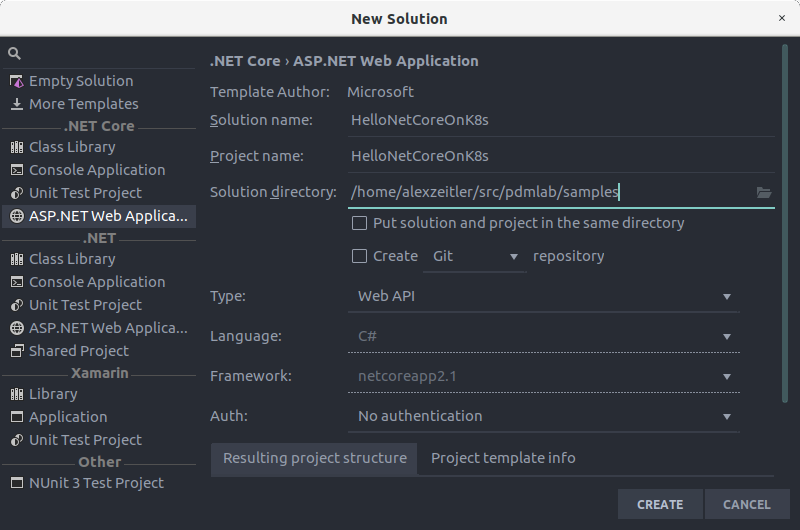
Next, we need some ASP.NET Core Code running in a Docker Container, so lets spin up JetBrains Rider and create a new Web API project for example:
The default code in Startup.cs is fine here:
public class Startup
{
    public Startup(IConfiguration configuration)
    {
        Configuration = configuration;
    }

    public IConfiguration Configuration { get; }

    // This method gets called by the runtime. Use this method to add services to the container.
    public void ConfigureServices(IServiceCollection services)
    {
        services.AddMvc().SetCompatibilityVersion(CompatibilityVersion.Version_2_1);
    }

    // This method gets called by the runtime. Use this method to configure the HTTP request pipeline.
    public void Configure(IApplicationBuilder app, IHostingEnvironment env)
    {
        app.UseMvc();
    }
}
The default ValuesController is fine as well:
[Route("api/[controller]")]
[ApiController]
public class ValuesController : ControllerBase
{
    // GET api/values
    [HttpGet]
    public ActionResult<IEnumerable<string>> Get()
    {
        return new string[] {"value1", "value2"};
    }

    // GET api/values/5
    [HttpGet("{id}")]
    public ActionResult<string> Get(int id)
    {
        return "value";
    }

    // POST api/values
    [HttpPost]
    public void Post([FromBody] string value)
    {
    }

    // PUT api/values/5
    [HttpPut("{id}")]
    public void Put(int id, [FromBody] string value)
    {
    }

    // DELETE api/values/5
    [HttpDelete("{id}")]
    public void Delete(int id)
    {
    }
}
Next, we need a Dockerfile in our project:
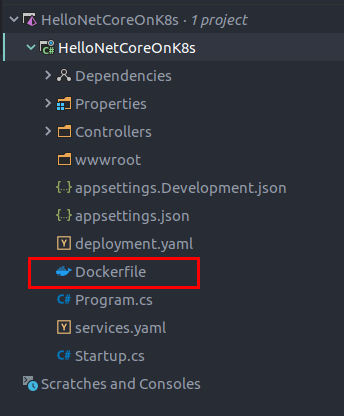
You can just grab the sample from the official Docker docs.
FROM microsoft/dotnet:sdk AS build-env
WORKDIR /app

# Copy csproj and restore as distinct layers
COPY *.csproj ./
RUN dotnet restore

# Copy everything else and build
COPY . ./
RUN dotnet publish -c Release -o out

# Build runtime image
FROM microsoft/dotnet:aspnetcore-runtime
WORKDIR /app
COPY --from=build-env /app/out .
ENTRYPOINT ["dotnet", "HelloNetCoreOnK8s.dll"]
Make sure to change the second param of the ENTRYPOINT array to the name of your DLL.
Next, build your image:
docker build -t hello-netcore-k8s .You should get a result similar to this:
Sending build context to Docker daemon  1.185MB
Step 1/10 : FROM microsoft/dotnet:sdk AS build-env
 ---> 6baac5bd0ea2
Step 2/10 : WORKDIR /app
 ---> Using cache
 ---> 8b1b0606dfc8
Step 3/10 : COPY *.csproj ./
 ---> Using cache
 ---> 987d3ba17281
Step 4/10 : RUN dotnet restore
 ---> Using cache
 ---> 829018788c05
Step 5/10 : COPY . ./
 ---> 60d4d75c8825
Step 6/10 : RUN dotnet publish -c Release -o out
 ---> Running in 3e13616e9438
Microsoft (R) Build Engine version 15.8.169+g1ccb72aefa for .NET Core
Copyright (C) Microsoft Corporation. All rights reserved.

  Restoring packages for /app/HelloNetCoreOnK8s.csproj...
  Generating MSBuild file /app/obj/HelloNetCoreOnK8s.csproj.nuget.g.props.
  Generating MSBuild file /app/obj/HelloNetCoreOnK8s.csproj.nuget.g.targets.
  Restore completed in 1.68 sec for /app/HelloNetCoreOnK8s.csproj.
  HelloNetCoreOnK8s -> /app/bin/Release/netcoreapp2.1/HelloNetCoreOnK8s.dll
  HelloNetCoreOnK8s -> /app/out/
Removing intermediate container 3e13616e9438
 ---> e0edd75b100e
Step 7/10 : FROM microsoft/dotnet:aspnetcore-runtime
 ---> 1fe6774e5e9e
Step 8/10 : WORKDIR /app
 ---> Using cache
 ---> 6c95530f2566
Step 9/10 : COPY --from=build-env /app/out .
 ---> 34932a25e3b6
Step 10/10 : ENTRYPOINT ["dotnet", "HelloNetCoreOnK8s.dll"]
 ---> Running in 599e41e2537f
Removing intermediate container 599e41e2537f
 ---> e24c6efee7d4
Successfully built e24c6efee7d4
Successfully tagged hello-netcore-k8s:latest
Hello k8s
In order to create a k8s deployment, we need a yaml file which specifies what should be deployed in minikube.
Itshould be placed in our project as well:

This is the content of the deployment.yaml
apiVersion: extensions/v1beta1
kind: Deployment
metadata:
  name: hello-netcore-k8s
spec:
  replicas: 3
  template:
    metadata:
      labels:
        app: hello-netcore-k8s
    spec:
      containers:
        - name: hello-netcore-k8s
          image: hello-netcore-k8s
          ports:
            - containerPort: 80
The important part for now is the spec/template/spec/containers:
name specifies the name of the containers and image specifies the name of the image the containers should be created from — this obviously is the name of the image we created recently.
So lets create that deployment now using kubectl:
kubectl create -f deployment.yamlNow check if the deployment has suceeded:
kubectl get deploymentsThe result will look similar to this:

Well... shouldn’t it be available? Lets dig a bit deeper and check the pods:
kubectl get pods
Looks like we have a problem here. Seems minikube doesn’t know about our recently created image 🤔.
The reason is that the Docker daemon in minikube doesn’t know about our Docker daemon on our Linux/macOS host.
But there’s a simple solution for that - we can share the context using this command:
eval $(minikube docker-env)You can stop sharing the context using eval $(minikube docker-env -u).
Another solution would have been to push the image to the official Docker hub but we want to stay local for this sample.
Now we have to build our image again because of the different context — remember how to do it?
docker build -t hello-netcore-k8s .Also we have to add the imagePullPolicy: Never to our deployment.yaml file:
apiVersion: extensions/v1beta1
kind: Deployment
metadata:
  name: hello-netcore-k8s
spec:
  replicas: 3
  template:
    metadata:
      labels:
        app: hello-netcore-k8s
    spec:
      containers:
        - name: hello-netcore-k8s
          imagePullPolicy: Never # <-- here we go!
          image: hello-netcore-k8s
          ports:
            - containerPort: 80
This ensures that the Docker daemon doesn’ t try to pull unknown images from the Docker registry.
So… lets fire up our deployment again:
kubectl create -f deployment.yamlValidating the deployment using kubectl get deployments looks much better now:

Also the result of kubectl get pods is much better now:

Accessing the Application using a Service
So you might ask yourself: how do I access the application now?
In k8s and minikube as well, you have to create a service to expose the application to a public IP/Port. If you’ re running your application in a managed k8s environment at your cloud provider of choice, the type of the service to expose your application is likely to be a LoadBalancer. When using minikube, the only service type available is nodePort.
The command to expose your application using a nodePort, is this:
kubectl expose deployment hello-netcore-k8s --type=NodePortThe result should be this:
service/hello-netcore-k8s exposedSo, at which IP and Port has it been exposed? When using minikube, you have to use this command (this is different when using managed k8s):
minikube service hello-netcore-k8s --urlYou’ll get an output like this:
http://192.168.99.100:31422Now lets call our ASP.NET Core API via http get 192.168.99.100:31422/api/values (I’m using HTTPie here, you can choose your preferred tool here — maybe Postman):
HTTP/1.1 200 OK
Content-Type: application/json; charset=utf-8
Date: Tue, 13 Nov 2018 21:30:33 GMT
Server: Kestrel
Transfer-Encoding: chunked[
    "value1",
    "value2"
]
Yay! We’re done!
But wait — why are we running on port 31442 and not port 80?
The reason for that is the default configuration of minikube which provides a Port range between 30000–32767 for services and by creating a service using the command from above a random port is picked from that pool.
We should fix this, right?
First, delete all services and deployments in minikube:
kubectl delete service hello-netcore-k8s
kubectl delete deployment hello-netcore-k8s
Then stop minikube using minikube stop.
Now start minikube again using:
minikube start --extra-config=apiserver.service-node-port-range=80-30000This will start minikube again, but with a Port range for services between 80-30000.
Now that we have port 80 available, how can we use it?
Add a services.yaml to your project with this content:
apiVersion: v1
kind: Service
metadata:
  name: hello-netcore-k8s
  labels:
    app: hello-netcore-k8s
spec:
  type: NodePort
  ports:
  - port: 80
    targetPort: 80
    nodePort: 80
    protocol: TCP
  selector:
    app: hello-netcore-k8s
This will assign port 80 to our service which is created using this command:
kubectl create -f services.yamlNow, kubectl get services will result in:

As you can see, port 80 is used inside the Pod and mapped to the host port 80 as expected.
With that, http get 192.168.99.100/api/values again results in:
HTTP/1.1 200 OK
Content-Type: application/json; charset=utf-8
Date: Tue, 13 Nov 2018 21:30:33 GMT
Server: Kestrel
Transfer-Encoding: chunked[
    "value1",
    "value2"
]
But this time it is clearly using port 80 - and now we’re done! 🙌
You can find the source code here.